NOTE: This solution should only be used in non-production environments as a method to get familiar with Ansible. For production use, I recommend installing Ansible on a dedicated Linux server.
An automated deployment tool is a must have for any IT environment. In my lab, that’s Ansible. I’ve used Ansible in my lab to automate VM deployment/destruction, adding SSH keys for remote access to my servers, joining/leaving AD domain, and monitoring the newly deployed VMs. This is very useful as I frequently deploy/destroy VMs for testing a specific use case.
For a Windows admin, Ansible can seem daunting… For one, it runs on linux. Second, it’s based off of Python. I’m here to tell you, it’s not that difficult. In fact, did you know that Ansible is one of the few configuration management tools out there that can easily/natively use PowerShell code?
In this post, I’m going to review the steps involved in getting Ansible installed & running on Windows Server 2019. While install times may vary due to lab resources and internet speed, I’m able to complete the steps outlined below for installing Ansible in a little over 20 minutes.
My Lab Setup
- Windows Server 2019 VM
- Needs internet access
- Logged in as default
administrator- Another admin account will work, but you’ll need to update some of the commands provided in this guide accordingly.
Video
Steps
- Open an elevated PowerShell prompt
- Right-click and select Run as Administrator
- PowerShell: Copy/Paste code below
- Install Chocolatey
- Install Cygwin
- Install Ansible requirements
Set-ExecutionPolicy Bypass -Scope Process -Force; [System.Net.ServicePointManager]::SecurityProtocol = [System.Net.ServicePointManager]::SecurityProtocol -bor 3072; iex ((New-Object System.Net.WebClient).DownloadString('https://chocolatey.org/install.ps1'))
choco install cygwin cyg-get -y
cyg-get openssh python38 python38-pip python38-devel libssl-devel libffi-devel gcc-g++ python38-cryptography
- Open the newly installed Cygwin Terminal
- Cygwin: Copy/Paste code below
- Install Ansible
/usr/bin/python3.8.exe -m pip install wheel
/usr/bin/python3.8.exe -m pip install ansible
- PowerShell: Copy/Paste code below
- Install OpenSSH Server
- Set default SSH shell to PowerShell
- Set SSH server to Automatic startup and start the service
Add-WindowsCapability -Online -Name OpenSSH.Server~~~~0.0.1.0
New-ItemProperty -Path "HKLM:\SOFTWARE\OpenSSH" -Name DefaultShell -Value "C:\Windows\System32\WindowsPowerShell\v1.0\powershell.exe" -PropertyType String -Force
Get-Service sshd | Set-Service -StartupType Automatic
Start-Service sshd
- Cygwin: Copy/Paste code below
- Test Ansible by outputting version
ansible --version

- Cygwin: Copy/Paste code below
- Generate SSH cert
- Accept defaults
ssh-keygen -t rsa -b 2048
- PowerShell: Copy/Paste code below
- Copy SSH pub cert to administrators_authorized_keys (Windows)
- Restart SSH server to apply changes
cp C:\tools\cygwin\home\Administrator\.ssh\id_rsa.pub C:\ProgramData\ssh\administrators_authorized_keys
$acl = Get-Acl C:\ProgramData\ssh\administrators_authorized_keys
$acl.SetAccessRuleProtection($true, $false)
$administratorsRule = New-Object system.security.accesscontrol.filesystemaccessrule("Administrators","FullControl","Allow")
$systemRule = New-Object system.security.accesscontrol.filesystemaccessrule("SYSTEM","FullControl","Allow")
$acl.SetAccessRule($administratorsRule)
$acl.SetAccessRule($systemRule)
$acl | Set-Acl
Restart-Service sshd
- Cygwin: Copy/Paste code below
- Test SSH to verify it’s working properly
- During the first run, you’ll need to answer
yes - After successful connection, you can
exitthe SSH session.
ssh administrator@$(hostname)
- Cygwin: Copy/Paste code below
- Add Windows server to Ansible inventory
- Configure Ansible connectivity settings
mkdir /etc/ansible
cat <<EOF > /etc/ansible/ansible.cfg
[defaults]
host_key_checking = False
callback_whitelist = timer

[ssh_connection]
ssh_args = -o ControlMaster=no
EOF
cat <<EOF > /etc/ansible/hosts
[windows]
$(hostname)
EOF
mkdir /etc/ansible/group_vars
cat <<EOF > /etc/ansible/group_vars/windows.yml
ansible_user: administrator
ansible_connection: ssh
ansible_shell_type: powershell
EOF
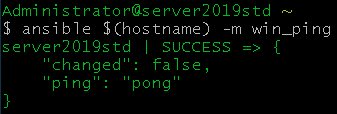
- Cygwin: Copy/Paste code below
- Test to make sure Ansible can manage the windows server
ansible $(hostname) -m win_ping
Ansible is now setup and ready for use. For me, this took around 20 minutes. This is a good point to take a snapshot of this VM or turn this server into a template depending on what you want to use Ansible for.
Now let’s put Ansible to use and perform an automated install of Veeam Backup & Replication Server. As Ansible is now installed, we will no longer be using the PowerShell session we had open and all further commands will be executed from within the Cygwin Terminal.
- Install Veeam Ansible collection: Copy/Paste code below
ansible-galaxy collection install veeamhub.veeam
- Add Ansible Playbook: Copy/Paste code below
- While it’s not a requirement, I recommend you update the passwords below. Don’t worry about creating these accounts. Ansible will do that for you!
sql_installis a temp Windows admin account used to install SQL Expresssql_serviceis the non-admin Windows account that the SQL service will use to runsql_usernameis the SQL SA account that will be created for SQL Express
cd ~
cat <<EOF > veeam-vbr-10-install.yml
---
- name: Veeam Backup & Replication v10 Community Edition Install
  hosts: $(hostname)
  tasks:
    - include_role:
        name: veeamhub.veeam.veeam_vas
        tasks_from: vbr_install
      vars:
        iso_download: true
        sql_install_username: "sql_install"
        sql_install_password: "ChangeM3!"
        sql_service_username: "svc_sql"
        sql_service_password: "ChangeM3!"
        sql_username: "sa"
        sql_password: "ChangeM3!"
        # https://docs.ansible.com/ansible/latest/user_guide/playbooks_vault.html#single-encrypted-variable
EOF
- Install Veeam Backup & Replication Server: Copy/Paste code below
Please note that this will first kick off a download of the Veeam ISO. ISO size is 3.8GB so your install time will vary. In my lab with gigabit internet, the time to complete the below playbook was 33 minutes.
ansible-playbook veeam-vbr-10-install.yml
